
Galaxy Z Fold 6 Beginner's Tutorial ( Tips & Tricks )
Welcome to WhatGear Reviews! In this video, I’ll be walking you through my step-by-step setup guide for the Galaxy Z Fold 6, sharing the same process I personally use with every new Samsung Galaxy phone. Having been a Galaxy user since the S3, I’ve spent over a decade refining my setup style. While I’m not suggesting you follow every single step exactly, think of this guide as inspiration for customizing your phone to suit your unique preferences.
To keep things authentic, I’ve got a brand new Samsung Galaxy Z Fold 6, still sealed in the box, and we’ll be starting from the very beginning.
DIAGNOSTICS OPTION
The first step is optional: You’ll need to agree to the end-user license, but you might want to consider opting out of sending diagnostic data to Samsung.
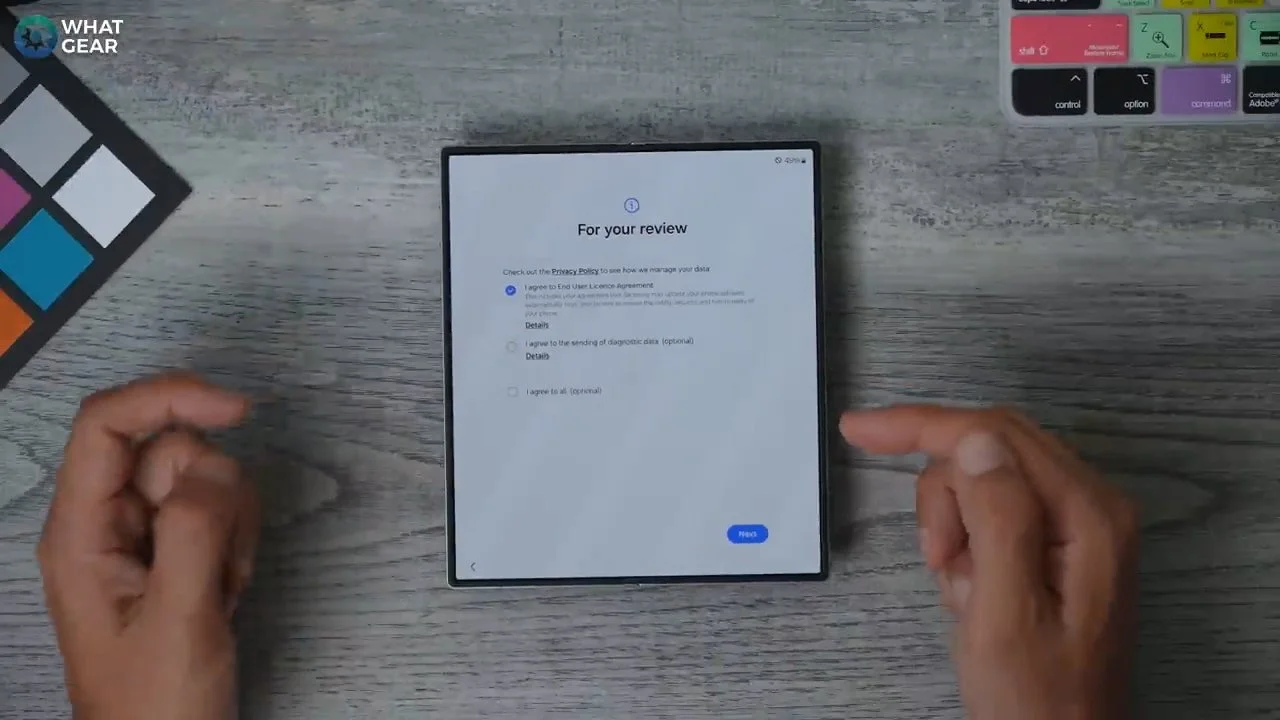
This data helps Samsung see which features you’re using, but it’s entirely up to you whether you want to disable that option.
MANUAL SETUP OPTION
When it comes to transferring data from your old device, I recommend setting up your new phone manually instead of using the transfer software. This allows for a cleaner setup and ensures your new device is tailored exactly to your needs.
The reason I suggest this approach is that if you're switching from a device that has bloatware (which many do these days), using the transfer tool can often bring all that unnecessary clutter over to your new Samsung device.

It’s not something you really need, so I prefer to start fresh, and I recommend you do the same.
In this guide, I’ll show you how to transfer your videos, photos, and apps without bringing along the bloatware.
THE SIM TRAY
Now, when it comes to inserting your SIM card, you’ll notice tiny markings on the SIM tray indicating SIM 1 and SIM 2.

If you only have one SIM card, you’ll want to use the SIM 1 slot, which is at the end of the tray. However, you can use two SIMs simultaneously if you prefer.
GOOGLE SERVICES
Next, you’ll need to sign in with your Google account. If you don’t already have one, you’ll need to create it.

When you reach the Google Services page, there are a few settings to pay attention to: it’s generally a good idea to leave device backup and location services enabled for added convenience and security.
Allow Scanning: This is an interesting option. You can choose to turn it off if you’re concerned about privacy. This feature allows Google services to detect nearby Wi-Fi networks and Bluetooth signals to improve location accuracy and other services. Disabling it can enhance your privacy and might even save some battery life.
Diagnostic Data: If you prefer not to send anonymous usage information to Google, you can turn this off. Disabling it won’t impact the functionality of your phone, so it’s entirely up to you. I’m choosing to turn off diagnostic data.
SAMSUNG ACCOUNT
On the next page, you’ll want to set up a Samsung account, and you’ll see why later in the video. If you’ve just created a Google account, the easiest way to sign up for a Samsung account is to sign in with Google—quick and simple.

Then you’ll encounter the Terms and Conditions related to Samsung apps. I recommend leaving this enabled and also turning on Offline Finding. As for Samsung services, it’s generally a good idea to leave them all enabled for the best experience with your device.These features help your phone run more smoothly.
LIGHT OR DARK
When it comes to choosing between light and dark mode, I always opt for dark mode for a couple of reasons. First, it’s easier on the eyes, especially during extended use.
Second, it saves a bit of power since both screens on this phone are AMOLED, which doesn’t consume power in the dark areas of the screen, making it more efficient. Plus, I personally prefer the overall look of dark mode.

You can also set your phone to automatically switch between light and dark mode based on the time of day, which is a handy option.
SAMSUNG FIND
Now that we’ve covered the initial setup, let’s talk about something crucial: protecting your investment. This phone is a significant investment, and you’ll want to ensure you can find it if it ever gets lost.
Head to your app drawer and locate the Samsung folder in the top left corner. Inside, you’ll find the Find My Mobile app. Open it, set it up, and grant it all the necessary permissions.

Initially, set it to "While using the app," but you’ll also need to allow it to run in the background constantly. This ensures that you can always track your phone if it goes missing.
Go to the settings and select "All the time" under location access. This ensures that if your phone ever goes missing, it will be easy to track down. If you have other Samsung devices, they will also appear in the Find My Mobile app, making it a convenient way to manage all your devices.
BIOMETRICS
Next, let's set up biometrics. On this phone, the fingerprint reader is located on the right-hand side. The most commonly used fingers are likely to be your right index finger, right thumb, and left index finger.
To set up your biometrics, you can manually navigate through the settings, but the quickest way is to use the search function. Tap the search icon, type in "Biometrics," and it will take you directly to the relevant page.
Once in the Security and Privacy section, you’ll see the option for biometrics highlighted. I recommend setting up the fingerprint option, as it’s more secure than face unlock.

While face unlock is faster and more convenient, especially for quick access, it’s not as secure as using your fingerprint. However, if speed and ease of use are your priorities, face unlock is a good option to consider.
With face unlock enabled, simply picking up your phone will allow it to detect and unlock. When it comes to registering fingerprints, the process is straightforward: rest your finger on the sensor, lift it, and repeat until the registration percentage reaches 100%. Be sure to roll your finger slightly as you go, so the sensor captures all the different edges—this ensures accuracy since you might not always press the sensor the same way every time.
After registering your first fingerprint, tap "Add" in the bottom left corner to register your thumb using the same method. Then, add your left index finger. You’ll likely notice that using your left hand involves a more hooking motion rather than a simple resting motion, so make sure the sensor captures that as well.
Once you've set up your fingerprints, you’ll be able to unlock your device easily with any of the registered fingers.
NAVIGATION
You might also notice that your Galaxy Z Fold 6 defaults to Samsung’s classic navigation system, which uses the three-button layout: Recent Apps, Home, and Back.
There's nothing wrong with the classic three-button navigation system, and it’s mirrored on the cover screen as well. If you prefer this style, feel free to stick with it. However, in keeping with the theme of this video, one of the first things I always do is switch to gesture navigation. Let me show you how to make this change.
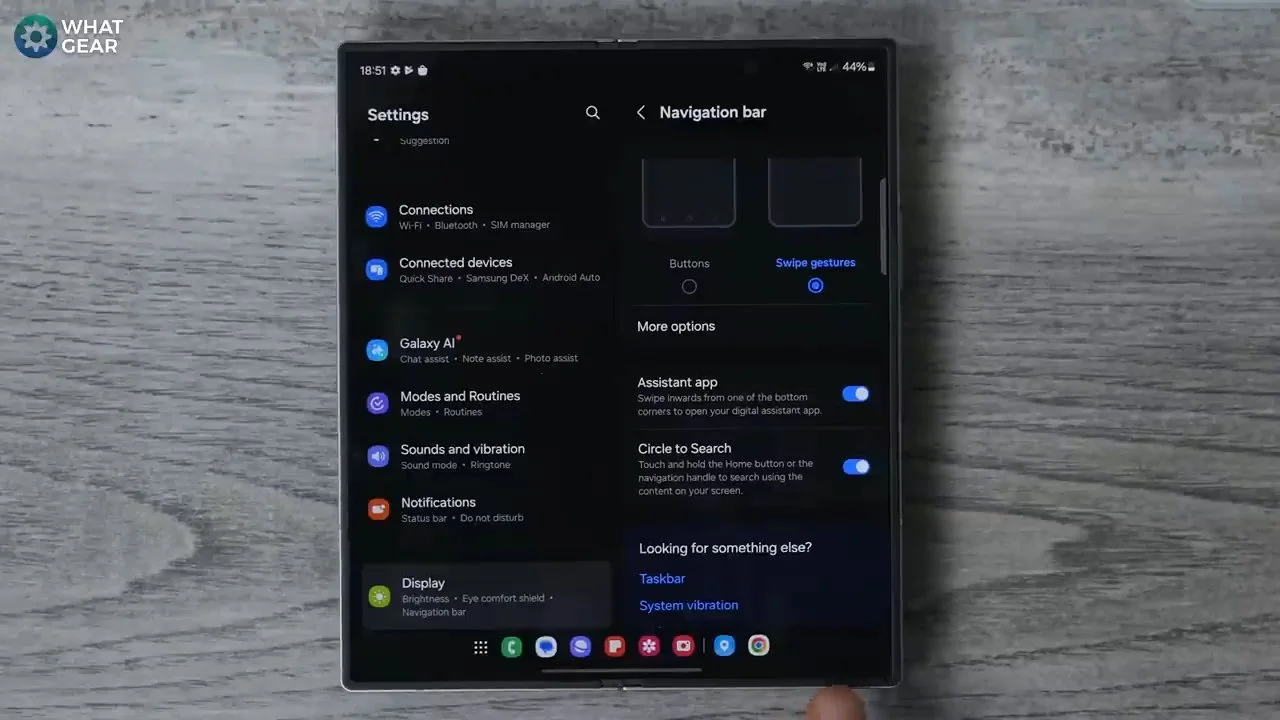
To access your settings, swipe down from the top of the screen and tap the settings cog. Instead of navigating manually, use the search function by tapping the magnifying glass icon. Type in "navigation," and you'll see "Navigation Bar" appear in the results. This setting is located within the Display settings, which isn’t immediately obvious.
Once you’re in the Navigation Bar settings, you can switch to Swipe Gestures. This change frees up space on your screen, making it look less cluttered. It’s also a more familiar setup if you’re coming from an iPhone, Pixel, or another Android phone that uses gestures by default.
BLANK CANVAS
Now that we’ve got a clean slate, the next thing I always do is customize the wallpaper. While the default wallpapers are quite nice, featuring subtle animations that play when you open the screen, and they look great on the cover screen too, you might want to make your phone more unique—something that stands out from other Samsung Galaxy Z Fold devices.
To start customizing, press and hold an empty spot on your home screen, which should be easy to find on a brand-new device. This will bring up your customization options. From here, select Wallpaper and Style, and then tap on Change Wallpaper. You’ll find a variety of preset options, including some with folding animations that are quite attractive but might feel a bit generic.
If you’re looking to add a personal touch, try using the Generative option. This feature leverages Samsung's AI to create a unique wallpaper based on your preferences. You’ll see different styles at the top—select the one that appeals to you. For instance, if you like a certain style but want to tweak the colours, you can do that here.
I’m personally drawn to the realistic style, but I prefer purple over pink, so I’m going to adjust the colours accordingly. This allows you to create a wallpaper that truly reflects your taste and makes your Galaxy Z Fold stand out.
After generating the wallpaper, I found a design I really like, so I’m going to set it as both the home screen and lock screen wallpaper for now. However, I usually prefer using my own wallpapers, so let me show you a couple of wallpapers that I’ve enhanced specifically for the Z Fold.

If any of these wallpapers catch your eye, just leave a comment, and I’ll send you a Google Drive link to download them. The two wallpapers featured here have been expanded to fit the unfolded screen perfectly, and they can also be cropped to fit the cover screen.
To change your wallpaper again, simply pinch the home screen and go to Wallpaper and Style. Select Change Wallpaper and this time, I’m going to choose one from my Gallery. Let’s go with this one for the lock screen—Master Yoda. Then, for the home screen, I’m going to use the Stormtrooper wallpaper.
Another cool feature to explore is in the wallpaper section. If you scroll down, you’ll find an AI section where you can add effects to your lock screen wallpaper based on your location. This adds a dynamic and personalized touch to your device.
If you tap the play button below, you can preview how this effect works. For instance, if it’s raining outside, your wallpaper will display a rain effect, and if it’s snowing, you’ll see a snow effect. It’s a fun little feature that adds a dynamic touch to your wallpaper, and it’s definitely worth enabling for the added utility.
Now that the wallpapers are set up—with the Stormtrooper on the home screen and Master Yoda on the lock screen—I’m pretty satisfied with how it looks. Interestingly, the wallpaper is currently showing sunrays, which is a rare sight given that it’s unusually sunny here in England today at 30 degrees! I’ve never seen this animation before because, well, the weather isn’t usually this nice here.
PERSONAL PALETTE
Let’s talk about personalizing your system’s colours. When you pull down the quick settings, you’ll notice the default system colours, which apply to the notification shade and other areas of the UI. These default colours can be a bit bland, so I always make it a point to personalize them.
To do this, pinch the home screen or hold down on an empty space and go to Wallpaper and Style. Here, you’ll find the Color Palette section. By default, you might see a basic blue, white, and black colour scheme, which can feel a bit dull. But by enabling the colour palette, you’ll unlock a variety of options that can really liven up your interface.

You can preview how these colours will look in different parts of the system, like on icons or in the calculator app. I’m opting for one with blue accents, which feels vibrant and fresh. If you prefer a more minimalist look, you can switch to the Basic section and choose your own two-tone or solid colour scheme.
Now you’ll notice that the titles and elements in your notification shade are highlighted in blue, with a mix of dark blue and grey, adding a touch of personalization compared to the default colours.
KEYBOARD PREFERENCE
The next step might be a bit controversial, especially considering the AI features integrated into the Samsung keyboard. However, one of the first things I do with almost every Samsung phone is download an alternative keyboard—specifically, the Google Keyboard. I still use the Samsung keyboard, and I’ll show you how I utilize both in this guide.
If you’re switching from an iPhone, you’ll probably appreciate how well the iOS keyboard predicts text and corrects errors. While the Samsung keyboard can handle these tasks fairly well, I often find myself needing to delete mistakes more frequently, and it sometimes adds periods where I don’t want them. On the other hand, I find the official Google Keyboard much more comfortable and accurate for typing.
Once you’ve downloaded the Google Keyboard, head to the settings to enable it. Simply toggle the switch to activate it, then go to Default Keyboard and set the Google Keyboard as your default. Trust me, you’ll likely appreciate the difference. Later in the video, I’ll explain why it’s still useful to keep the Samsung keyboard enabled as well.

If you want to switch back to the Samsung keyboard, simply tap the small keyboard icon at the bottom of your screen. This will give you the option to switch back to the Samsung keyboard. The key difference with the Samsung keyboard is its AI features. For example, you can use AI Compose to generate text based on a brief prompt, correct your writing style, or even perform a grammar check. These features work exceptionally well on the larger screen, but on the smaller screen, the occasional errors can be more noticeable, which is why I prefer using the Google Keyboard for most tasks.
However, there’s a specific way I utilize the Samsung keyboard when I need its AI capabilities, which I’ll show you shortly.
KEYBOARD SWITCH
After switching back to the Samsung keyboard to demonstrate this, I found that it’s a bit tricky to return to the Google Keyboard without diving into the settings again to re-enable it.
There’s a quick way to switch between keyboards without diving into the settings: add the keyboard app to one of your home screens.

To do this, open your app drawer and find the keyboard icon. For now, I’m placing it on page two of the device, but I’ll show you where I usually keep it on Samsung phones.
Once it’s on your home screen, simply open the app, and you can select the input method to switch back to your preferred keyboard. This makes it much easier to toggle between the Google Keyboard and the Samsung Keyboard as needed.
SAMSUNG KEYBOARD SETTING
If you prefer sticking with the Samsung keyboard, there’s one feature I highly recommend enabling, especially for typing on the home screen. Let me show you how: switch back to the Samsung keyboard, then tap the settings cog within the keyboard.
Scroll down to the section labelled Swipe, Touch, and Feedback, and select Keyboard Swipe Controls. From there, enable Swipe to Type.

This feature makes typing on the outer cover display much easier, as you can simply glide your finger across the keyboard. It’s particularly effective at predicting text in this mode, which is crucial given how close together the keys are on the cover screen. This is how the keyboard looks once configured.
If you switch to the Google Keyboard for the cover screen, you can still use swipe gestures without needing to enable any additional settings. It works just as smoothly as the Samsung keyboard.
POWER KEY
Now, the next tip is something I always do, but it's entirely optional. By default, holding down the power key activates Bixby. Bixby is great if you’re heavily integrated into the Samsung ecosystem with smart home devices, wearables, and more, as you can start workouts or control devices using your voice.
However, I personally don’t use it much, so I remap the power key right away. Here’s how:

First, swipe down your notification shade and tap the settings icon. You can manually navigate to this option by going to Advanced Features and then selecting Side Key, but a quicker way is to use the search function—just tap the magnifying glass and type in "Side Key."
Once you’re in the Side Key settings, I recommend switching the Press and Hold function to open the power menu instead of Bixby. Additionally, I like to set the Double Press of the power key to open my Google Wallet for quick access.
ADDING MORE GOOGLE ACCOUNTS
That brings us to setting up Google Wallet, as it's not installed on your device yet. Head over to the Play Store, type in "Wallet," and install it. While I’m considering giving Samsung Wallet another try—it’s been years since I used it—my cards are already linked to my Google account, so Google Wallet is currently the most convenient option for me.
Once Google Wallet is installed, go back to the settings page, find the Double Tap option for the power key, and select Open App. Then, search for "Wallet" and choose it as your default. Now, whenever you’re at a store, simply double-tap the power key, and Google Wallet will open instantly, ready for payment—whether your phone is open or closed.
Since the power key also functions as the fingerprint sensor, it makes the payment process twice as fast, so you can make purchases even more quickly.

If you need to add another Google account, there are several ways to do it, but one of the easiest is through Gmail. Open the Gmail app, tap your profile icon in the top right corner, and select Add another account. This method will add your Google account to the system, allowing you to use it for app downloads and installations, rather than relying on a work account you may have used during the initial setup.
MANUAL UPDATE PHASE 1
Updating your apps right away is crucial, as some Google services won’t function properly until they’re fully updated. Here’s the best way to ensure everything is up and running smoothly: Open the Play Store, tap your profile icon in the top corner, and go to Manage Apps & Device.
Here, you’ll see if there are any updates available for your existing apps—many of which are likely to be Google’s official apps.

If you skip this step, certain Google services, like Gmail, Google Assistant, and Gboard, might not work as expected until they’re updated. You should see these updates pending and ready to download as soon as you check.
It’s important to update these key tools, such as Google Partner Setup and Wi-Fi Provisioner, to ensure your phone functions perfectly from day one.
MANUAL UPDATE PHASE 2
In addition to Google apps, there’s another group of apps that often gets overlooked but also needs to be updated immediately: your Samsung apps. On your home screen, you’ll find the Galaxy Store—Samsung’s own app store, separate from the Google Play Store.
Although the Play Store is the primary source for most apps, many pre-installed Samsung apps reside in the Galaxy Store, and they often won’t be up-to-date out of the box. To update these apps, open the Galaxy Store, tap the menu, and check for updates. You might see a number indicating the available updates—I had 41 updates waiting on my device.

It’s essential to update all of these apps on day one. While you could wait for the automatic updates, it’s possible that, without manual intervention, your phone could be running older versions of apps for several days, preventing it from performing at its best.
When reviewing these apps, you’ll notice that many are essential, such as Language Core, Customization Service, and the Authentication Framework—particularly if you plan to use Samsung’s password manager or the Find My Phone feature, which I covered earlier.
EVEN MORE Ai FIRE POWER
Now that your apps are up to date, let me introduce you to something I always add to Google-powered phones: Google Assistant. This tool is excellent for general searches and commands. You can tap the mic icon to ask anything or swipe up from the corner to open the Assistant, which you can also activate with your voice.
However, there’s an even more advanced AI available from Google called Gemini. To get it, head to the Play Store and search for Gemini. It will appear as a Google app—install and open it. After clicking Continue, you’ll be prompted to use Gemini.
To switch from Google Assistant to Gemini, tap your profile icon at the top, and select Gemini as your default assistant. Now you’re all set with Gemini, providing an upgraded AI experience on your device.

The search bar on your home screen remains linked to the standard Google Assistant, but if you swipe up diagonally, you’ll bring up the Gemini Assistant. This comes in handy when you’re browsing a website, for example. Let’s say you visit a site and want to get more information—after rejecting all the cookies, swipe up from the corner, select Add to this screen, and Gemini can analyze what’s on the page for you.
It functions similarly to the circle-to-search feature, but with the added ability to use URLs for searching. You can type in your query, and Gemini can summarize the content or provide additional insights. While there are other methods to achieve this, I find Gemini Assistant particularly useful for handling more complex tasks compared to the standard Google Assistant.
By setting this up, you get the best of both worlds: the standard Google Assistant for quick tasks and searches, and the more advanced Gemini Assistant for deeper, more nuanced interactions.
PASSWORD MANAGER
At this point, you’ll need to make a decision based on your personal preferences. If you’re like me and use Google Chrome across your computers and other devices, with all your passwords linked to your Google account, you might prefer using Google Password Manager.
However, if you’re deeply integrated into the Samsung ecosystem, you might want to stick with the Samsung Password Manager. If you’re satisfied with Samsung Pass, there’s no need to change. But if you prefer switching to Google Password Manager, here’s how to do it:

First, open your settings and use the search tool to type in "password." You’ll find the relevant option under General Settings labelled Passwords, Passkeys, and Autofill. Scroll down, and you’ll see the current password manager settings. If Samsung Pass is selected, and you’d rather use Google, simply switch your preferred service to Google Password Manager.
Once you’ve made the change, your device will use Google Password Manager for auto-filling passwords. This choice is entirely optional—stick with Samsung Password Manager if that’s what you’re comfortable with.
FRESH START
Let’s move on to setting up your apps. Some of them you might want to keep on your home screen, while others might not be as essential.
The best approach is to start with a clean slate. To do this, simply hold your finger down on each app and select Remove, or drag them to the Remove option at the top of the screen. For example, I prefer to keep the Play Store on the second page since I only use it when I need to download an app, rather than every day.
I also prefer the Google Calendar over Samsung’s, so I’ll remove the Samsung Calendar from the home screen. Note that I’m not uninstalling these apps—just removing them from the main screen. The Samsung Store is useful but not a daily necessity, so it will also go to the second page.
Now, with a blank canvas, we can start adding the essentials. In the center, you’ll typically find the Samsung weather widget. I don’t use this particular widget, so I’ll remove it as well.

One of the widgets I do use on almost every phone, and that I’m frequently asked about, is the clock widget. Specifically, I use the Google Clock. This widget comes pre-installed on Pixel phones, which is where I first discovered it, but it’s available for any Android device.
The Google Clock includes features like timers and a stopwatch. Once you’ve installed it, just pinch the home screen, go to Widgets at the bottom, scroll down to find the Google Clock, and I recommend selecting the widget that suits your style and needs. I personally always go with this one.
I prefer the analog clock style, so I’m adding it to the main home screen right here. As for the Google Assistant search bar, there’s really no need for it to stretch all the way across the screen. I find it more practical to place it where my thumb can easily reach it.
Next, it’s time to download your most-used apps. Head over to the Google Play Store and take some time to review the apps on your previous device. Install the ones you know you’ll use regularly, and leave out the random apps you’ve accumulated over the years but no longer need. That’s what I’m going to do now.
SORT THE DRAW
Once your apps are downloaded, you’ll find them all in the app drawer. You might notice that they’re scattered in no particular order.
The phone tries to predict which apps are most important to you, but I’m not a fan of this approach. So, here’s what I always do to organize them better.

To keep your app drawer organized, tap the three dots in the top corner, select Sort, and choose Alphabetical order.
This will arrange everything you’ve downloaded exactly where it should be, saving you time when searching for apps that aren’t on your home screen.
PLACEMENTS
Before you start placing apps, there’s something you should do right away: pinch the home screen to access your settings and check the grid sizes. On the large screen, the grid is usually set to 6x6, which is fine and the maximum grid size available. However, the cover screen is a bit different.
You’ll notice that the cover screen still has the default wallpaper and all the apps you removed from the main screen. That’s because the screens operate independently, which is actually beneficial. You don’t want the cover screen to mirror the inside of the device because it would quickly become cluttered.
To start fresh, remove everything from the main cover screen that you don’t plan to use regularly. You’ll also notice that by default, only four apps are displayed across the bottom. If you’re like me and prefer having five apps, as on most other phones, here’s how to adjust it: pinch the screen again, go to Settings, and in the Home screen grid section, change the layout to 5x6.

Now that we’ve created some extra space at the bottom of the screen, let’s make the most of it. I always like to add WhatsApp to the bottom row since it’s one of my go-to messaging apps. You’ll also see that Samsung Internet is here by default, which is where I prefer to keep it. However, even though Samsung Internet has some powerful AI tools, I typically use Chrome as my primary browser, so I place it in the centre of the bottom row.
These apps are essential to me, so they stay in this prime location. I’m also going to remove the weather widget and replace it with the Google Clock widget, which I find incredibly useful. Not only does it show the time, but it also serves as a shortcut to alarms and other clock features. I’ll resize the widget to save space, allowing for more apps on the screen.
To make more room, I’ll also reduce the size of the Google Assistant widget. This way, I can fit more apps in the available space. Rather than manually replacing every single app, let me show you a quick organizational trick.
COVER SCREEN FOLDERS
On the third screen, where I keep all my games and social media apps, I’ve noticed that on the cover screen, you’re less likely to consume content from services like Disney Plus or Prime Video. So, on the cover screen, I group these apps into folders. Creating a folder is simple: just drag one app on top of another.
For example, drag Prime Video onto Disney Plus to create a folder. Once the folder is created, tap the plus icon to select multiple apps and add them to the folder all at once, saving you the hassle of moving them individually. This is a huge time saver.

You can name the folder whatever you like. I do the same for music streaming apps—just drag YouTube Music onto Deezer, tap the plus icon, and add any other music apps to the folder. This method keeps your cover screen neat and organized.
The reason I organize my apps and widgets this way is that I like to keep a music widget on my home screen for quick access. To add one, pinch the home screen, go to Widgets, and select the music service of your choice. For this device, I’m using the Tidal widget, although I sometimes opt for YouTube Music. Adding this widget allows me to jump directly into Tidal from the home screen.
I also keep other music services like Spotify handy for podcasts, which is why I’ve set up these folders.
PAGE LAYOUT STRATEGY
Now, I’ll continue organizing, and then I’ll walk you through the final setup.
Here’s how I’ve set up my cover screen:
- Page One: This page is dedicated to everyday use, with apps that I access daily.
- Page Two: This page is for work and finance. I’ve grouped all my finance apps into one folder here. I also have ChatGPT, which I use alongside Gemini for tasks like generating graphics or answering questions—sometimes ChatGPT offers better results.

At the top, I’ve added the Google At a Glance widget, which displays the weather, date, and any upcoming calendar events.
- Page Three: This page is for audio and gaming. I’ve placed the Tidal widget here, along with the Device Care widget, which is great for clearing background apps and freeing up RAM by tapping the little brush icon—perfect to do before starting a gaming session.
WIDGETS & STACKS
I’ve intentionally left a gap on this page to show you something I like to do: add a series of widgets. To do this, pinch the screen, go to Widgets, and explore some cool options.
One of my favourites is the Digital Wellbeing widget, which tracks my app usage and screen time. I particularly like that you can hold your finger on the widget, go to settings, and adjust the transparency, minimizing the background colour to better match your wallpaper.
I also like to create a widget stack by holding my finger on an empty space and selecting Stack Widgets. I typically include the Battery widget in this stack. The battery widget can be made transparent as well, and it shows the battery life of third-party devices like headphones. Since I use Galaxy Buds and a Galaxy Watch, their battery levels will display here once connected.

The buds and their case are now showing up, and there’s a designated space for the watch as well. Next, to complete this setup, hold your finger down on the widget stack, tap the plus icon at the end, and add the Buds Controller to the stack. Like the other Samsung widgets, this one can also be made transparent, which is a nice touch. It seems that all Samsung official apps offer the option for a transparent background, which helps keep the interface clean and cohesive.
Now, I have a collection of useful tools all in one place on this narrow display. This setup is always reliable for quick access to essentials, but there’s always room for some Call of Duty, PlayStation, or music when the time allows.
UNFOLDED LAYOUT
You may have noticed that I’ve grouped all my movie and music streaming services into folders on the cover screen. That’s because if you’re going to watch movies on this device, you’ll likely do it on the larger inner display. I follow a similar formula for the setup on the big screen. The front page contains frequently used apps and tools, while page two is reserved for entertainment.
Now that I’ve spent some time setting up the big display exactly how I like it, let me walk you through it quickly. I’ve placed the Google Clock, Google At a Glance, and Battery widgets here, along with my Calendar widget. The Google search bar is at the top, and I’ve kept Gemini for quick access when swiping up. You’ll also notice that I’ve replaced Samsung Internet with Chrome on the home screen, as most of my accounts are linked to Chrome. However, I still use Samsung Internet occasionally, thanks to its powerful AI features.
With your Buds and watch now displaying in the battery widget, you’ve got everything neatly organized. To further streamline your setup, consider adding the Buds controller to your widget stack. Simply hold down on the stack, tap the plus icon, and select the Buds controller. Like other Samsung widgets, this one can also be made transparent, maintaining a clean and minimal interface.

This arrangement consolidates your essential tools on the narrow display, leaving you with easy access to your favourite apps and functions. I’ve organized my cover screen with practical apps, but I also leave room for a bit of fun—whether it’s gaming or streaming music.
For movie streaming services and other media apps, I’ve grouped them into folders on the cover screen. This makes sense because you’ll likely use the larger inner display for watching movies. My main screen is dedicated to everyday essentials and tools, while the second page is all about entertainment.
On the fourth page, I reserve space for temporary apps, like those needed for travel or specific events. This keeps your primary pages uncluttered and focused.
COVER WALLPAPER
Returning to the cover display, you might notice I’ve kept the default wallpaper, which works nicely with the layout. When choosing a cover screen wallpaper, consider how it complements the inside display.
If you’re a fan of themes like Star Wars, you can keep the same aesthetic inside and out, or switch it up for a more subtle look.

To change the wallpaper, pinch the screen, go to Wallpaper, and select your preferred image.
You can customize both the inside and outside wallpapers independently, ensuring your phone reflects your style.
A CONVENIENT SETTING
Here’s a useful tip for accessing apps at the top of the screen: Enable One-Handed Mode in the settings.

Just search for it, toggle it on, and you’ll be able to swipe down from the bottom to shrink the screen for easier reach.
GALAXY Ai EDGE
I’ve set up my edge panel with quick access to the Samsung keyboard, Samsung Notes, Samsung Internet, and Samsung Recorder—all powerful tools with AI features.

By having these on the edge panel, I can easily switch between them without cluttering my main screen.
A USEFUL APP PAIR
Creating app pairs is another great way to boost productivity.
For example, pairing Samsung Internet with Samsung Notes allows you to use both apps simultaneously, leveraging their AI capabilities for tasks like summarizing web pages and taking notes.

You can even save app pairs to the edge panel for quick access.
THE POWER OF SMART SELECT
If you have a ticket or any important information you need quick access to, use the Smart Select tool in the edge panel.

This feature lets you pin content like QR codes to your home screen temporarily, ensuring you have it handy when needed.
Another small but useful trick: If the taskbar at the bottom of the screen is distracting, hold down on an empty space next to it to hide it. You can bring it back the same way.
HOW TO TRANSFER PHOTOS & VIDEOS
To transfer your photos and videos from your old phone, use Samsung’s Smart Switch app. It’s easy to set up and allows you to selectively transfer data without bringing over unnecessary clutter.

Once your apps and data are in place, customize your quick settings by adding useful features like Dolby Atmos, Secure Folder, and ChatGPT. You can also enable Quick Settings Instant Access to bring down all settings with a single swipe.

Finally, ensure you’re getting the best signal by enabling Wi-Fi calling in the settings.
CUSTOM NOTIFICATIONS
To avoid being overwhelmed by notifications, customize which apps can send alerts through the App Notifications settings. You can also change the notification sound to something unique by downloading a sound effects app.

For even more personalization, use the Color by Keyword feature to assign specific colours to notifications from certain contacts. Combine this with the Edge Lighting Style to create a visually distinct notification experience.

SECURITY CHECK
Make sure your phone is secure by enabling App Protection in the Security and Privacy settings. This will help protect against malware, especially if you’ve transferred data from an old device.
For those concerned about privacy, you can choose to process AI data only on the device by navigating to Galaxy AI settings and enabling this option.

I hope this guide has helped you set up your Samsung Galaxy device in a way that’s efficient, personalized, and secure. Remember, you don’t have to follow my steps exactly—use this guide as inspiration to create a setup that works best for you.
For more tips and tricks, check out my other videos where I dive into the powerful features of Samsung devices. Thanks for reading, and I’ll see you in the next one!