
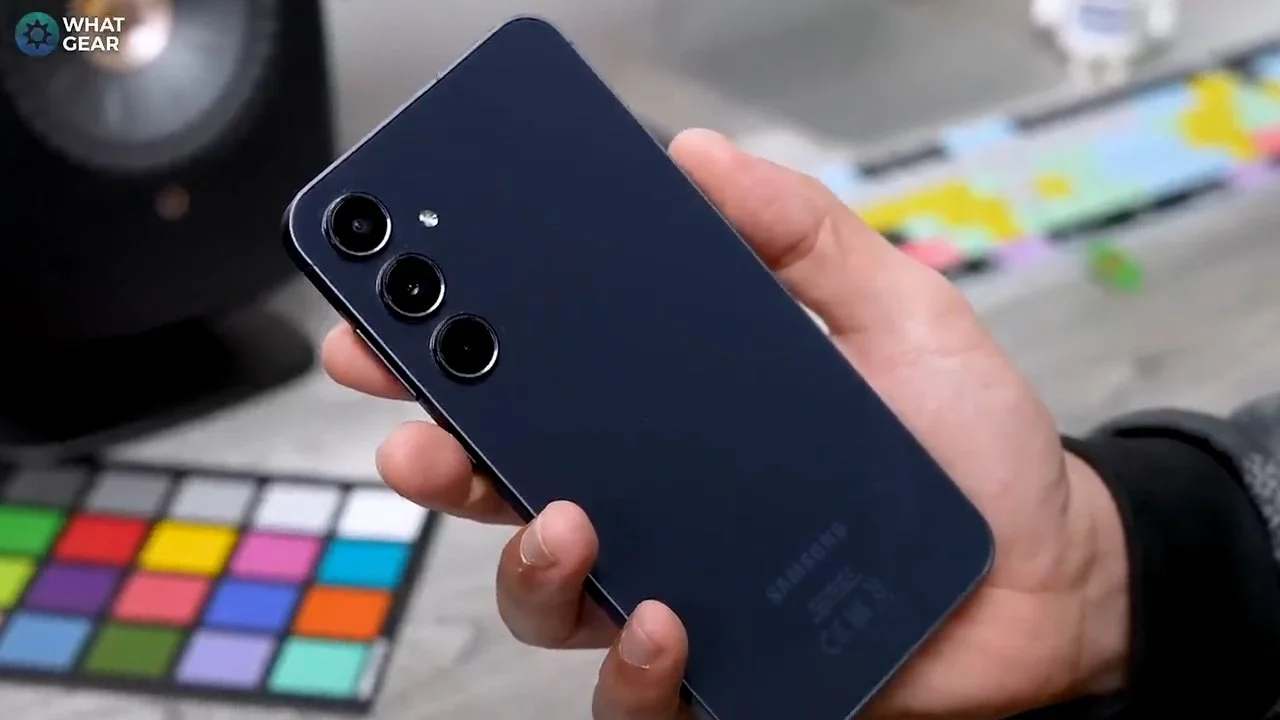
Samsung Galaxy A55 - First 30 Things To Do! ( Tips & Tricks )
Just picked up a Samsung Galaxy A55 and want to make sure you set it up perfectly from day one? You’re in the right place.
With the tips, tricks, and hidden features I’m about to share, you’ll be miles ahead of most Galaxy A55 users, who might never unlock the full potential of their device—unless they catch this video!
Now, you might be thinking, "Okay, sure." Maybe this is your first time on my channel, but here’s the deal: I’ve been using Samsung Galaxy devices since the Galaxy S3—that’s 12 years of Samsung know-how.
So trust me when I say, you’re in for a treat. And as Anakin Skywalker would say, "Join me, and together we can rule the galaxy."
Power key
One of the first things I do with any Samsung phone is customize the side button for better functionality. Here’s how to do it:
Go into Settings - Scroll down to Advanced Features and find Side Key.
By default, double-tapping the side key launches the camera, and holding it down wakes Bixby. Now, ask yourself—are you ever going to use Bixby? If not, here's what you should do:
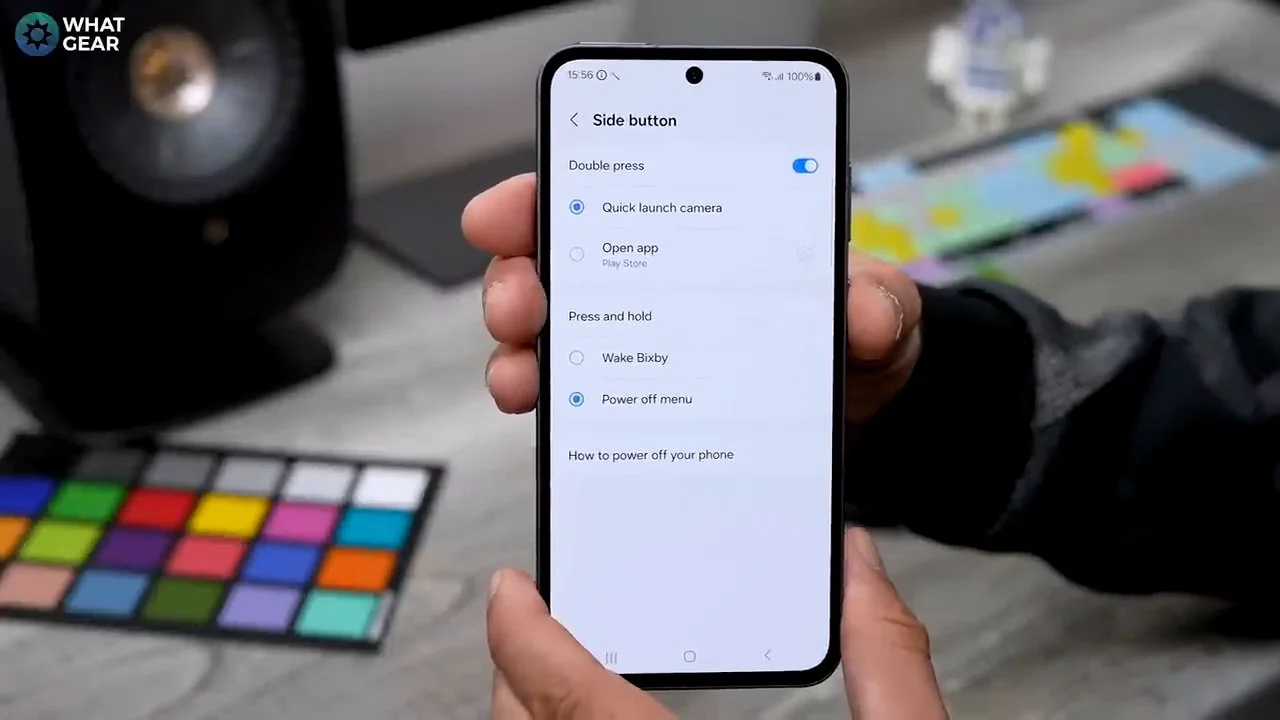
Change Bixby to the Power Menu:
Switch the long-press function from Bixby to the Power Menu. Now, when you hold down the side key, you’ll see options to power down, restart, access medical info, or make an emergency call.
Customize Quick Launch: Next, I change the double-tap action from opening the camera to something more useful—like Google Wallet. Here’s how:
Select Open App under the double-tap option - Choose Google Wallet (or your preferred app).
Now, whenever you double-tap the side key, you can quickly access Google Wallet for payments or loyalty cards. It’s efficient, easy, and a huge time-saver!
Basic customisation
When you get a new phone, one of the first things you’ll likely want to do is personalize it. Customizing your wallpaper is a great way to make your device feel more personal, and here’s how you can do it easily:
Pinch the Home Screen: Start by pinching anywhere on the home screen to bring up customization options.
Select “Wallpaper and Style”: At the bottom of the screen, tap the Wallpaper and Style icon. Here, you can choose to change either the home screen wallpaper, the lock screen wallpaper, or both.
Browse Wallpapers: Tap Change Wallpaper, and you’ll see a selection of featured wallpapers at the top. Scroll down, and you’ll find options from your photo gallery or various categories. You can even go to the Galaxy Theme Store to explore more choices.

Tip for Free Wallpapers: In the Galaxy Theme Store, tap the "Top" tab and use the drop-down filter to find free wallpapers. There are plenty of great options, including animated live wallpapers.
Set Your Wallpaper: Choose the wallpaper you want. If you want a separate wallpaper for the lock screen, simply untick the option to apply it to both screens. You can also move the image around to adjust its position and even add frames or effects if desired.
Once you’ve selected and adjusted your wallpaper, just hit Done to save your changes.
For this guide, I used a custom Wolverine wallpaper. If you’d like the same one, just leave a comment, and I’ll send you a link!
Lock-screen tweaks
Now that we’ve customized the home screen wallpaper, let’s move on to personalizing the lock screen. The process is similar:
Pinch the Home Screen: Like before, pinch anywhere on the home screen. Go to Wallpaper and Style in the bottom left corner.
Select Lock Screen Customization: Instead of selecting "Change Wallpaper," tap on the lock screen preview. This will bring you to the lock screen customization window.
Clock Customization - Tap the Clock: Here, you can change the size of the clock—make it large or keep it subtle.
Clock Style: Explore different clock styles until you find one you like. Make sure to choose a clock color that contrasts well with your background, so it stands out clearly. You can even fine-tune the colour with a hex code for precise customization.
Adding Widgets - Below the clock, you’ll find a + Widget option. Some useful widgets to consider:
Alarm: Handy for a quick reminder that your alarm is set, so you don’t miss anything important.
Battery Status: Particularly useful if you have multiple Samsung devices.
Samsung Health: Great for tracking your steps, especially if you use the Samsung Galaxy Watch.

Once you’ve added your widgets, hit Done to save the setup.
Just below the widgets, you’ll see Notification Icons - Tap this to customize the style:
Detailed or Icon View: You can either show detailed information or just icons.
Transparency: Adjust the transparency to match your lock screen design—this feature looks especially cool if you want a clean, modern look.
At the bottom of the lock screen, you’ll see the Contact Information field. Here, you can add an email address or phone number in case someone finds your phone and wants to return it. It’s a small but potentially helpful touch.
Lastly, the phone and camera icons at the bottom of the lock screen can be customized. You can remap these shortcuts to apps you frequently use, making it easy to access them even when your phone is locked. Simply drag inwards from the icon to open the selected app.
Once you're done tweaking these settings, hit Done to finalize your personalized lock screen!
Unique colour palette
Now that we’ve customized the home screen and lock screen, the next step is to personalize the user interface (UI) to match your style. Here's how to do it:
Pinch the Home Screen: Just like before, pinch anywhere on the home screen and select Wallpaper and Style.
Activate the Color Palette: You’ll notice a section called Color Palette, which is off by default. When you enable it, the system will automatically adjust the UI colours to complement your wallpaper.

Choose Your Color Scheme: You’ll be presented with a few options, and a preview at the top will show you how each colour palette will look on your phone. Swipe through the available options and pick the one that fits your style.
Explore Basic and Two-Tone Colours: If you want more control, you can switch to Basic Colors and choose from solid colours or two-tone combinations for a more customized look.
Remember, the colour scheme you choose is entirely personal, so feel free to experiment until you find what works best for you. Whether you go for something subtle or bold, customizing the UI colours is a great way to make your phone truly yours!
Better organisation
Here’s a tip that will save you a lot of time when searching for apps on your Samsung Galaxy device. When you swipe up on your home screen, it opens the app drawer. You probably already knew that. But by default, the apps are not organized in any particular order. The phone tries to predict which apps you'll use next, which can sometimes be helpful, but often it’s more frustrating than convenient.
Here’s a better way to organize your apps - Open the App Drawer: Swipe up on the home screen to access your apps.

Sort Alphabetically: Tap the three dots in the top right corner of the screen, select Sort, and choose Alphabetical order.
Now, every time you open your app drawer, you’ll know exactly where to find your apps based on their alphabetical position. This is much quicker than having to search for an app each time or relying on the system’s predictions. It’s a simple tweak, but it will make navigating your phone much smoother!
Maximum space
One of the best features of the Galaxy A55 is its large, vibrant screen. However, having only four icons per row doesn’t take full advantage of all that screen space. By maximizing the number of icons and widgets on your home screen, you can reduce the amount of swiping and scrolling, saving time and improving efficiency.
Here’s how to make the most of your screen space:
Adjust the Home Screen Grid: Pinch the screen to access the customization options.
Tap on Settings, which will bring you to the Home Screen settings page.
Here, you can change the Home Screen Grid size. I recommend switching it to 5x6, which allows you to fit more icons and widgets on the screen.

Adjust the App Grid: While you’re in the settings, change the App Grid to 5x6 as well. This gives you more icons per screen, reducing the need for constant swiping.
Add Widgets: After you’ve expanded your grid, you’ll likely have extra space on your home screen. To fill this space, you can add widgets.
Pinch the home screen again, and at the bottom, tap on Widgets. You’ll see a selection of available widgets, including clocks, weather, and more.
Browse through the options and add the ones that are most useful to you, like a clock or a weather widget. These widgets not only add functionality but also match the color scheme of your chosen palette.
By customizing the grid and adding widgets, you’ll make your Galaxy A55 much more efficient and tailored to your preferences. Explore the available widgets and find what works best for your needs!
Widgets stacks
If you're looking to optimize your home screen with more functionality, you should consider using Widget Stacks. This allows you to layer multiple widgets on top of each other, letting you swipe between them without cluttering your screen.
Here’s how to create a Widget Stack: First, hold your finger down on an existing widget (in this case, I have the Google Search Bar).
A menu will appear with the option to Create a Stack. Tap this option, and you’ll be able to add more widgets on top of the current one.
Choose Useful Widgets: You can add several widgets based on what’s most useful to you. For example, the Device Care widget allows you to quickly clear background apps from the home screen.
Another useful widget is Digital Wellbeing, which helps you monitor your screen time and app usage.

Swipe between these widgets by simply swiping left or right on the stack.
Add More Widgets: To add more widgets to the stack, hold your finger down on the stack again, select Edit Stack, and tap the plus icon to add additional widgets.
Turn Off Auto-Rotate: When you create a Widget Stack, there’s an option to enable Auto-Rotate Widgets. I highly recommend turning this off, as the widgets will rotate randomly, which can be disruptive.
Bigger Widgets: You can also create Widget Stacks with larger widgets. The process is the same: hold down on the widget, create the stack, and it will show you which other widgets can be added based on the size.
By using Widget Stacks, you’ll keep your home screen clean and organized while having quick access to important functions.
Notification customisation
Here's a great personalization tweak you should make on day one to help you quickly identify notifications on your phone.
Go to Settings - Scroll down to Notifications and tap on it.
Choose Notification Pop-Up Style: Here, you can toggle between Brief and Detailed notification pop-ups. I recommend Brief, as it keeps things more minimal by not displaying the full message for each notification.
Edge Lighting Style: This is where things get interesting! You can choose from a variety of notification animations that will appear whenever you receive a notification. These animations show up behind the brief pop-up at the top of the screen.

Customize the Colour: You can also customize the colour of the edge lighting. By default, it’s set to Auto, but you can manually select from a full range of colours to match your style.
Adjust Transparency & Duration: You also have the option to adjust the transparency of the pop-ups and extend the duration of the animations, so they stay visible on the screen for longer.
My Favorite Lighting Style: I personally love the Spotlight effect. It subtly lights up the top of the screen, providing a gentle notification reminder without being too distracting.
Take a few minutes to explore and customize the notification style that works best for you—it’s a small tweak that can make a big difference!
Custom notifications
Here's another useful tip for customizing your notifications, it can save you a lot of time when identifying important messages. Staying within the Notification Pop-Up Style menu, let’s set up Color by Keyword:
Set a Keyword: In the Color by Keyword section, you can input specific words or names. For example, type your name (just as a demo) and hit plus to add it.
Assign a Color: Now, you can choose a colour for that keyword. Every time you receive a message with that word or name in it, the notification will appear in the colour you selected.
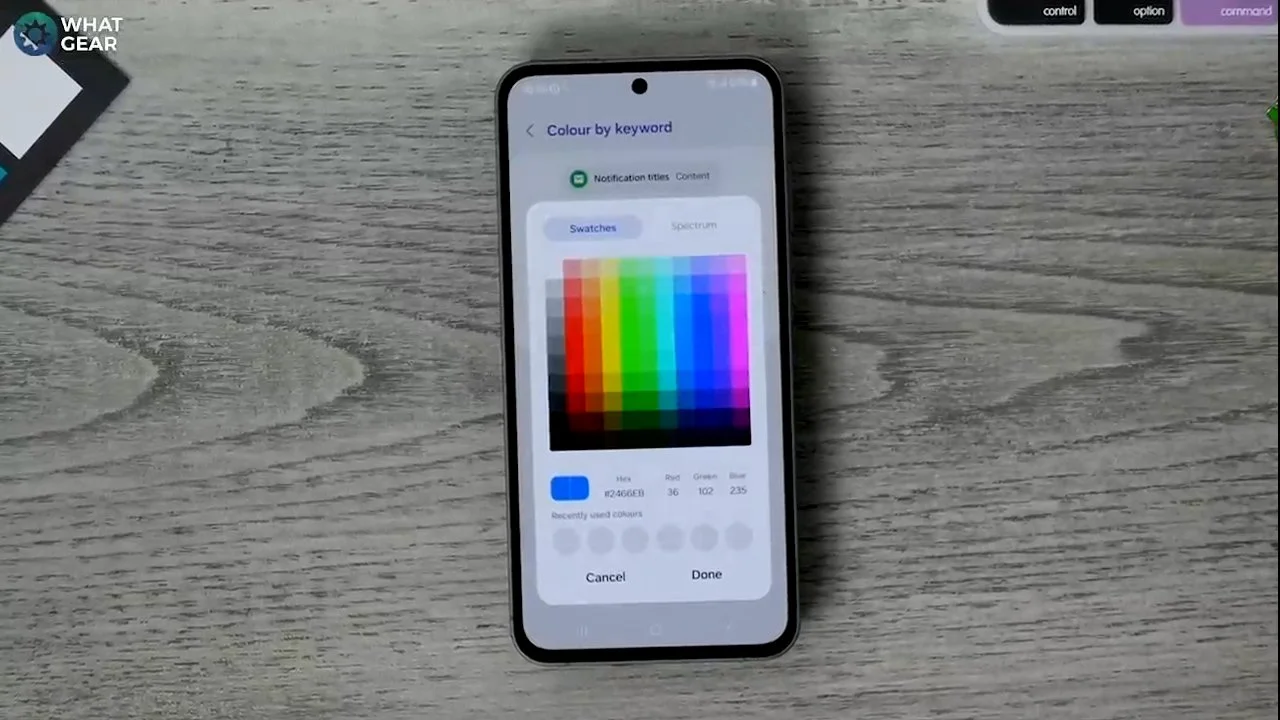
Best Practice: A great way to use this feature is by adding your family and friends' names and assigning each a different colour. This way, when you get a message, you'll know who it's from based on the colour of the notification.
This tip works perfectly in conjunction with the notification animations I mentioned in the previous tip, adding another layer of personalization and making it easier to identify important messages at a glance.
More unlock options
A key aspect you should prioritize from day one is the security of your device. While most of the tools you need are built-in, many users overlook their full potential. Here’s how to maximize the security features of your Galaxy A55 and make your phone safer and more convenient to use daily.
Step 1: Access Security Settings
Head into Settings and scroll down to Security and Privacy. When you first open this page, your phone will scan the device for potential security issues and provide alerts for anything that needs attention.
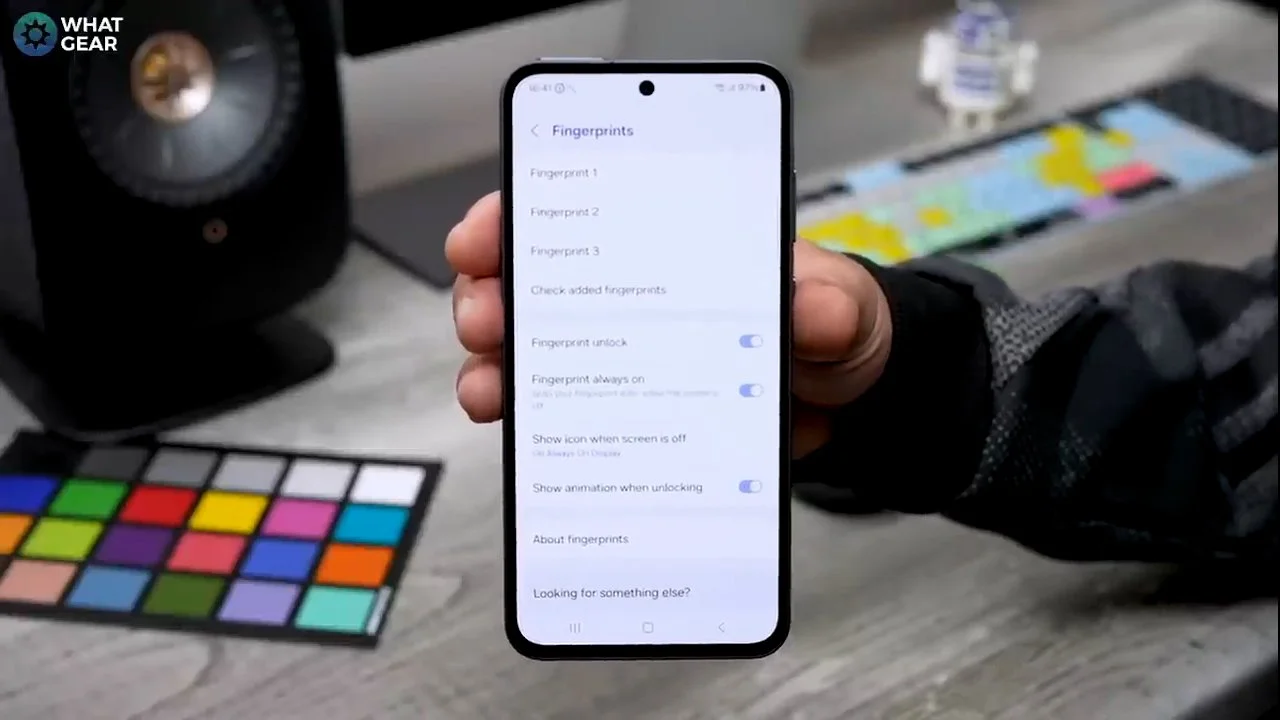
Step 2: Set Up Biometric Authentication
Most people only set up one fingerprint during the initial setup. Instead, I recommend registering both your thumb and first finger on your dominant hand, and your first finger on the other hand. This ensures that no matter how you pick up your phone, you can unlock it quickly. The Galaxy A55 allows for three fingerprints, so it’s a good idea to use all available slots.
Step 3: Enable Face Recognition
To further speed up access, head back to Security and Privacy, then go to Face Recognition and set up Face Unlock. Keep in mind that the Galaxy A55 uses 2D face unlock, which is not as secure as fingerprints, but it’s a convenient option for day-to-day use.
By using both fingerprint and face recognition, you'll have a combination of convenience and security at your fingertips.
Extra app protection
Here’s another important security tip to ensure your Galaxy A55 is fully protected.
Step 1: Go to Security and Privacy
Head back to Settings and scroll down to Security and Privacy. This time, focus on any suggestions highlighted in the section. These are areas where your phone’s security could be improved. One of the standard suggestions you'll often see is App Security.

Step 2: Enable App Protection
Tap on App Security, and you’ll see the option to turn on App Protection. I highly recommend enabling this. Depending on your region, this feature might be powered by McAfee, which isn't available everywhere. Essentially, App Protection will scan all installed apps on your phone, providing periodic scans for vulnerabilities or suspicious software. This way, you can ensure there are no viruses or malicious apps lurking on your device.
Most people may not even realize this feature is available on the Galaxy A55, but now you're ahead of the curve. Keep your phone secure and enjoy peace of mind!
Auto blocker
Here’s another crucial security tip for your Galaxy A55 that you should enable from day one.
Step 1: Stay on the Security and Privacy Page
Ensure everything on the Security and Privacy page is marked green. If it isn’t, address the issues highlighted. Now, let’s focus on enabling Auto Blocker, which is switched off by default.

Step 2: Enable Auto Blocker
The Auto Blocker is a valuable feature designed to protect your device from malicious software, not just from apps or online sources but also through physical connections like cables.
If someone tries to plug your lost phone into a computer and load software onto it, Auto Blocker will prevent that. It also minimizes the risk of viruses being transferred via suspicious cables.
While this isn’t something to stress over daily, turning on Auto Blocker adds an extra layer of security and peace of mind. Better to be safe than sorry!
Safer WiFi connection
If you often connect to public Wi-Fi networks or use other people’s Wi-Fi, here’s an essential security tip to keep your data safe.
Step 1: Go to Security and Privacy Settings
Head to your Security and Privacy settings and scroll to More Security Settings. There you’ll find an option called Secure Wi-Fi.
Step 2: Enable Secure Wi-Fi
This feature isn’t enabled by default, so tap Continue twice to activate it. Samsung’s Secure Wi-Fi acts like a built-in VPN, offering 1GB of free data protection per month. If you need more, there’s an option to subscribe for additional data.

Step 3: Turn on Auto Protect
It’s highly recommended that you turn on Auto-Protect Wi-Fi. This setting automatically encrypts your data when you connect to public hotspots, helping to safeguard your information from potential hackers who target public Wi-Fi.
Step 4: Manage Usage
You can manually enable or disable Secure Wi-Fi as needed. If you find yourself using more than 1GB of data per month, consider upgrading your subscription.
By using this feature, you can ensure that your data remains private, even on risky public networks. Stay tuned for an easier way to toggle this feature, which I’ll show you in the next tip!
Offline finding feature
Here’s a crucial security tip you should set up on day one to protect your device in case it’s lost or stolen.
Step 1: Access Lost Device Protection
Go to Security and Privacy Settings, and this time head to Lost Device Protection.
Step 2: Turn on Last Location and Offline Finding
By default, Last Location and Offline Finding will be switched off. I highly recommend turning both of these on.

Step 3: How Offline Finding Works
When Offline Finding is enabled, your device will continue to ping its location to nearby Samsung devices, even if it’s powered off. Every time another Samsung device passes by, your phone’s location is updated, allowing you to track where it is.
This feature ensures that you can locate your phone even if someone has switched it off, providing an extra layer of security in case your device goes missing.
How to improve audio
Let’s move on to a tip that’s less about security and more about enhancing your overall experience with your phone.
Step 1: Enable Dolby Atmos
Head into Settings, then go to Sound and Vibration and scroll down to Sound Quality and Effects. By default, Dolby Atmos and Dolby Atmos for Gaming will be switched off. I recommend turning both of these on immediately, as they noticeably improve the speaker quality on your phone.

Step 2: Quick Access Shortcut
Once enabled, you can also create a quick shortcut to toggle Dolby Atmos on or off without needing to navigate back through the settings. I’ll show you how to set up this shortcut shortly to make it even easier to control.
Navigation gestures
Here’s a quick setting you can change to enhance your user experience and clean up the appearance of your home screen:
Step 1: Switch to Swipe Gestures
Head to Settings, then Display, and scroll down to Navigation Bar. Here, you’ll find the option to switch from the traditional button navigation to Swipe Gestures.

Step 2: Why Use Swipe Gestures?
Swipe gestures provide a more seamless and clutter-free experience by removing the navigation buttons at the bottom of the screen. It’s very easy to use: swipe up and hold for your background, swipe from the left to go back, and swipe from the right to move forward.
This change gives your phone a cleaner, more fluid look and feel. I recommend giving it a try and seeing how it improves your navigation experience!
Auto eye comfort
Here’s a tip to help protect your eyes and improve your sleep:
Step 1: Enable AI Comfort Shield
Go to Settings, then head into Display, and look for AI Comfort Shield. Tap on it to enable the feature.

Step 2: Adaptive or Custom Settings
You can either set it to Adaptive, which adjusts based on the lighting around you throughout the day or switch to Custom. I recommend scheduling it from sunset to sunrise, but you can also customize it to align with your routine—starting before bedtime and extending for an hour after you wake up.
This feature reduces blue light, helping ease eye strain and promoting better sleep. Give it a try!
Custom eq profile
Here’s a tip to enhance your audio experience and protect your ears:
Step 1: Enable Adapt Sound
Head into Settings, scroll down to Sound and Vibration, and then Sound Quality and Effects. At the bottom, you’ll find the Adapt Sound option. It’s off by default, but when you turn it on, you can specify your age. These presets are general estimates of your hearing ability based on age.

Step 2: Personalized Sound Profile
For a more accurate sound experience, scroll down to the bottom of the Adapt Sound page and select Add Personalized Sound Profile. This will take you through a hearing test to assess your hearing levels. Once completed, your Galaxy A55 will create a custom EQ, tailored to your hearing for an optimized listening experience, especially when using earbuds or headphones.
This personalized sound profile ensures better clarity and balanced sound for your ears.
Battery tip 1
One of the standout features of the Galaxy A55 is its impressive battery life. You can extend it even further by following these simple tips:
Enable Dark Mode to Save Power
Go to Settings → Display.
You'll see the option for Light Mode and Dark Mode. By default, your phone is set to Light Mode.

Switch to Dark Mode, and under Dark Mode Settings, set it to follow a schedule from sunset to sunrise, similar to the blue light reduction feature.
The advantage of Dark Mode is that it reduces the screen’s power consumption. Only the lit-up portions of your screen use power, so when more of your screen is in dark mode, your battery lasts longer. This may seem like a small change, but over time, those small savings can really add up, helping you conserve battery life throughout the day.
Battery tip 2
Here's another power-saving tip to help extend the battery life on your Galaxy A55:
Adjust Motion Smoothness
Go to Settings → Display.
Under Motion Smoothness, the default setting will be Adaptive, which runs at a 120Hz refresh rate. While this provides smoother scrolling and transitions, it consumes more power.

To conserve battery, switch this setting to Standard. This will lock the refresh rate at 60Hz, which is half as smooth but still sufficient for most users, and it saves a significant amount of battery life.
Enable Adaptive Brightness
While you're in the Display settings, make sure Adaptive Brightness is enabled. This feature adjusts your screen brightness automatically based on the lighting around you, reducing unnecessary battery consumption when high brightness isn’t needed.
Both of these tweaks can significantly improve your battery life without sacrificing too much in user experience.
Protect your battery
Here’s the third battery-saving tip for your Galaxy A55:
Enable Battery Protection
Go to Settings → Battery.
Look for Battery Protection, which is turned off by default. Tap on it and enable it.
This feature helps extend the lifespan of your battery by preventing it from constantly charging to 100%. Once your phone is fully charged, it allows the battery to drain to 95% before recharging again, avoiding the wear and tear that constant charging can cause.

There are also additional options:
Adaptive Charging: Ideal if you charge your phone overnight. This setting will charge your phone based on your sleep schedule, ensuring it only reaches maximum charge closer to the time you wake up.
Maximum Battery Protection: Limits charging to 80%, which can significantly extend the life of your battery.
For most users, the Basic setting works best, but consider your charging habits and choose what fits your needs.
Auto optimisation
Here's a helpful tip to ensure your Galaxy A55 runs smoothly and efficiently:
Enable Auto-Optimization: Go to Settings → Device Care.
Scroll down to find Auto-Optimization and enable it.
With this feature turned on, your phone will periodically restart to clear background processes and optimize performance. You can choose between two options:

Auto Restart When Needed: The phone will automatically restart if it starts running too hot or encounters performance issues.
Auto Restart on Schedule: Set specific times for the device to restart and refresh.
I recommend selecting the "When Needed" option, as it allows the phone to manage any performance issues autonomously. Turning this on from day one will help maintain smooth operation.
Extra Edge panels
Let's dive into one of the most underutilized features on Galaxy phones: the Edge Panel. The Edge Panel is a handy tool located on the side of your screen, offering quick access to apps and features. Here's how to fully customize it:
Customize Your Edge Panels: Swipe out the Edge Panel on the side of your screen. Tap the pen icon at the bottom to customize the apps.
For even more customization, tap the settings icon that briefly appears at the bottom.
From here, you can add additional edge panels. Some of the most useful options include:
Smart Select
Tasks
Weather
Compass

Once added, you can easily swipe through your edge panels to access these features. For example, swipe to the Smart Select panel, then to the Weather panel, and so on.
Using Edge Panel for Split Screen:
The Edge Panel also makes split-screen multitasking super simple:
Swipe out the Edge Panel - Drag an app (e.g., Google Play Store) to the top half of your screen. Choose another app for the bottom half.
If you frequently use the same app pair, tap the three dots in the middle of the screen, then tap the star icon. This allows you to save the app pair to your home screen or the edge panel for quick access later.
Edge Panels offer tons of customization and efficiency—make sure you're using them to their full potential!
Dynamic Lock Screen
At the start of the video, you may have noticed that I didn't change the lock screen wallpaper—and there's a good reason for that. I wanted to introduce you to a really cool feature on Samsung devices called the Dynamic Lock Screen.
How to Set Up Dynamic Lock Screen: Pinch the home screen and go to Wallpaper & Style. Tap on Wallpapers and scroll down to find Dynamic Lock Screen.
Here, you can download various wallpaper packs that will automatically change every time you pick up your phone.

There are multiple categories to choose from, such as cats, dogs, nature, and more. The wallpaper images in these packs update every two weeks, so if you’re a fan of animals or specific themes, you can enjoy fresh images regularly.
If you want even more options, there’s a shortcut to the Galaxy Store at the top, where you can explore additional packs. Dynamic Lock Screen is a great way to keep your phone looking fresh with minimal effort!
Customize Lock Screen
Let’s start with the art-themed lock screens. Now that we’ve customized the lock screen, here’s another hidden feature you might not know about: Lock Screen Widgets.
How to Access and Customize Lock Screen Widgets:
On your lock screen, double-tap the clock at the top. This will open a panel with various widgets.
At the bottom of the widget panel, tap Settings. You’ll need to use your biometrics to unlock this.

Inside the settings, you’ll see a list of available widgets. You can toggle on the ones you want and turn off the ones you don’t. If you want to reorder the widgets, simply tap Reorder at the top, then drag and drop them to suit your preferences.
Once customized, you can quickly access features like the voice recorder, music controls, and other handy tools just by double-tapping the clock on your lock screen. This makes it easy to get what you need without unlocking your phone!
Ad restrictions
Let’s face it—no one likes being bombarded with ads, and even worse, having their personal data sold to advertisers. Luckily, there’s a hidden feature on Galaxy phones (and other Android devices) that can help you manage this better. Here's how to find it:
Open your Settings: Navigate to Security and Privacy.
Scroll to the Bottom: Tap on More Privacy Settings.
Manage Ads: Scroll down again to find the Ads section.

In the Ads section, you’ll have three options:
Tap on Ad Topics to see the categories of ads that are being tailored to you as you use your phone.
Once this list is populated, you can disable specific topics and opt out of ads related to those subjects.
You’ll need to allow some time for the phone to gather data on the ad categories, but after that, you’ll have better control over the kinds of ads you’re exposed to.
Secure Folder
Here’s a security tip you should set up right from day one: Secure Folder.
To enable it: Go to Settings and navigate to Security and Privacy.
Scroll down to More Security Settings, just below the Auto Blocker section.
Tap on Secure Folder.

Once set up, this feature creates a private, locked folder within your phone, accessible only by your fingerprint or a unique PIN.
You can store sensitive files, documents, and personal information in this folder, ensuring that only you can access its contents. Using the File Explorer, you can easily move any important files or documents into the Secure Folder for added protection.
This is a great way to safeguard your most confidential information right on your device!
How to add Ai
One of the advantages of the Galaxy S24 over the A55 is its built-in Samsung Galaxy AI, but that doesn’t mean we can’t supercharge the A55 with AI capabilities of its own. Enter ChatGPT!
Here’s how you can enhance your A55 with AI-powered assistance using ChatGPT:
Download ChatGPT: Head to the Play Store, download and install the ChatGPT app. Once installed, set it up. If you want to maximize its potential, you can upgrade to ChatGPT-4, but you can still use ChatGPT 3.5 for free.
Add ChatGPT to Your Home Screen: Tap on one of your existing widgets.
Edit the widget stack - Add the ChatGPT widget for quick AI access right on your home screen.
Now, you’ll have instant access to ChatGPT whenever you need it.

Adding ChatGPT to Quick Settings: Swipe down from the top of the screen twice until you see the pencil icon.
Tap on the pencil to edit your Quick Settings menu.
Drag the ChatGPT shortcut to one of the top positions in your Quick Settings for easy access.
This makes it incredibly convenient to use ChatGPT as an AI assistant, similar to Google Assistant or Samsung Galaxy AI. Simply swipe down, tap on the ChatGPT icon, and start interacting with your personalized AI assistant.
Bonus Tip: You can also upgrade to ChatGPT-4, enabling features like using your camera with ChatGPT and sending images for detailed discussions with the AI. This makes ChatGPT an even more advanced tool, potentially surpassing Galaxy AI for some users.
With this setup, your Galaxy A55 will have powerful AI functionality right at your fingertips!
Quick settings customisation
Here's a final tip, and it's something you should definitely set up on day one to fully customize your Quick Settings menu with the shortcuts that matter most. This will include some of the essential features I’ve mentioned throughout this guide.
Now that you’ve enabled the Quick Instant Access: Swipe down to bring up the entire Quick Settings menu.
Tap the pencil icon at the top to enter Edit Mode.
At the bottom, you’ll see a list of available quick settings that haven't been added yet.
For example: Secure Wi-Fi: You can add this to your quick settings for on-demand access when you connect to public networks.

Dolby Atmos: If you need to adjust Dolby Atmos for a better sound experience, you can quickly toggle it from here.
Secure Folder: Access sensitive, locked-away files with a simple tap instead of navigating through menus.
Battery Protection: This feature, which limits charging speeds during sleep to protect your battery, can be added to your Quick Settings for immediate access. You can hold your finger on it to easily switch between different charging modes without digging into the settings menu.
By customizing your Quick Settings, you'll have all these important shortcuts right at your fingertips—making your phone much more efficient and tailored to your needs.
Hidden WiFi tool
Here's a final bonus tip that will help you assess the best spots in your home for optimal Wi-Fi speeds, not just for your phone but for all your devices. It can even help you decide where to place your modem or if you need extenders.
Here’s how to do it: Go into your Settings and tap on Connections.
Select Wi-Fi and then tap the three dots in the top right corner.
At the bottom of the menu, you’ll see an option for Intelligent Wi-Fi.

Now, here’s the trick: Tap Intelligent Wi-Fi 6 or 7 times, and you’ll unlock the hidden Connectivity Labs settings. In this hidden menu, you’ll find various tools to assess Wi-Fi networks around your home.
Go to Home Wi-Fi Inspection and follow the steps to test your Wi-Fi signals room by room.
This will help you identify any dead zones and determine whether you need a modem upgrade or Wi-Fi extenders.
This is a great way to ensure you’re getting the most out of your Wi-Fi setup. If you're looking for more tips on customizing your Samsung Galaxy device, be sure to check out my other guides. And if you found this article helpful, a thumbs up and subscription would mean a lot! See you in the next one!